Convert Quicktime Movies to AVI encoded with MPEG-4 (MOV to AVI) with Linux/Ubuntu

A lot of camcorders record in the .mov (Quicktime) format. It has high quality video and depending on the underlying codec it provides a good compression, but it is too proprietary and very often you might not be able to play it on different devices.

AVI on the other hand is more widely accepted format. AVI, like MOV, is a media container that envelops encoded media. In this example we will convert Quicktime video (.mov) to .avi that contains media encoded with mpeg-4.

If you want to preserve the original quality and resolution with pcm_u8 (analog 8bit) audio:

ffmpeg -i inputfile.mov -sameq -vcodec msmpeg4v2 -acodec pcm_u8 outputfile.avi

Obviously I would prefer something better for the sound so I normally use the mp3 as an audio codec. To do this make sure that you have the libmp3lame0 package installed to do that:

sudo apt-get install libmp3lame0

And then:

ffmpeg -i inputfile.mov -sameq -vcodec msmpeg4v2 -acodec libmp3lame outputfile.avi

If you want to change the resolution then add the -s option and specify the horizontal and vertical resolution. Make sure to preserve the original aspect ratio:

ffmpeg -i inputfile.mov -s 960x540 -sameq -vcodec msmpeg4v2 -acodec libmp3lame outputfile.avi

Broadcom Wireless Chipset (BCM4311, BCM4312, BCM4321, and BCM4322) on Ubuntu Karmic.

If you have a Broadcom wireless chipset BCM4311, BCM4312, BCM4321, or BCM4322 it will not work with Ubuntu Karmic after an upgrade or an install.

To get it working, you need to install the STA driver. You can get it from the Broadcom site:

http://www.broadcom.com/support/802.11/linux_sta.php

Follow the instructions in the README.txt file which is on same page.

After you have finished installing it the wireless will work, but only until the next reboot. To make this permanent follow these steps:

1. Run:

sudo rmmod ssb

For some reason you cannot blacklist the ssb module. It always runs on boot even if it is in the blacklist.conf file.
After that you need to run this to get rid of the ssb module permanently:

sudo update-initramfs -u

2. Now that we got rid of ssb, we need to make sure that lib80211 is loaded on boot. To do that add lib80211 to the end of the /etc/modules file:

echo "lib80211" | sudo tee -a /etc/modules

I went ahead and added wl to it as well:

echo "wl" | sudo tee -a /etc/modules

So the /etc/modules file looks like this:


# /etc/modules: kernel modules to load at boot time.
#
# This file contains the names of kernel modules that should be loaded
# at boot time, one per line. Lines beginning with "#" are ignored.
lp
rtc
lib80211
wl

3. Now we need to make sure that “insmod wl.ko” as specified in the README.txt file runs every time we boot. There might be a better way to do this but I just added it to the /etc/rc.local file.

Before I did this I copied the wl.ko file to the /lib/modules/2.6.31-14-generic/kernel/lib directory. This way we can get rid of the source files we downloaded from the Broadcom site along with the binaries we compiled and not worry about losing the wl.ko file:

sudo cp wl.ko  /lib/modules/2.6.31-14-generic/kernel/lib

Then add the line “insmod /lib/modules/2.6.31-14-generic/kernel/lib/wl.ko” at the end of the rc.local file, right above the exit 0 line:

sudo gedit /etc/rc.local

Here is how the rc.local file looks:

cat /etc/rc.local

#!/bin/sh -e
#
# rc.local
#
# This script is executed at the end of each multiuser runlevel.
# Make sure that the script will "exit 0" on success or any other
# value on error.
#
# In order to enable or disable this script just change the execution
# bits.
#
# By default this script does nothing.

insmod /lib/modules/2.6.31-14-generic/kernel/lib/wl.ko
exit 0

4. Last step is to pin down the linux kernel so that we don’t upgrade the kernel accidentally along with the other updates:

System -> Administration -> Synaptic Package Manager

Then click on the “Status” button and select “Installed”. Then search for “linux-“. Select all packages that start with “linux-” and then Package -> Lock Version.

Clone Disk Drives with Ubuntu. Make an Exact Copy of Your Hard Drive.

Before I start, I would like to clarify that this step by step tutorial applies not only to duplicating hard drives that have Linux OS on them. You can clone pretty much any drive. What is on the hard disk is irrelevant; it could be Windows, Mac OS, Linux, just data, etc. There have to be just a few basic things in place:

  1. The target drive should be the same size or bigger than the source disk drive.
  2. Have a Linux Live CD or a Linux bootable USB drive or some other way of booting into Linux (we will be using Ubuntu’s Live CD for this tutorial).
  3. Access to the internet.
  4. There is a presumption that you know how to install a hard drive.

Making an exact copy of a hard drive (or any drive for that matter – CD, DVD, USB, etc.) is very easy and quick with Linux. One of the most popular commands on Linux to do this is dd. It is a very powerful utility that was originally developed for the UNIX operating system and is now default on every Linux distribution. It does a bit for bit copy of the data and it does not care about cylinders, partitions or files. Here is an example of a dd command that would make an exact copy of one disk to another:

dd if=/dev/sda of=/dev/sdb bs=64k

The bs option specifies the block size and it could be omitted, but it would speed up the process since the default block size is only 512 bits. dd is very effective and powerful command but it is not very suitable when you are trying to make a copy of a failing or failed disk. dd is not designed to read and recover bad sectors.

There are a number of other open source programs developed since dd (dd variants) that would address situations where there might be some bad drive sectors and they perform faster and more efficient than dd. Some of those are: dd_rescue, dd_rhelp and GNU ddrescue. GNU ddrescue is the one that I would recommend using if you want to clone a drive. It works both for a perfectly good drives that you would like to clone and for failed drives that you would want to recover data from.

Install the new drive.

The new drive should be of the same or bigger size. You might have to get the BIOS to recognize the new disk; in most cases that is not necessary. After you have put the drive in, boot into Linux from another device. An Ubuntu Live CD would be perfect for that. You can download an ISO image from here.

Now you have to find out what the drives’ logical names are. Open up a terminal window: Accessories -> Terminal or Alt + F2, then type in gnome-terminal and hit Enter.
In the terminal window type sudo lshw -C disk:


sudo lshw -C disk
  *-disk:0
       description: ATA Disk
       product: WDC WD400BB-75FJ
       vendor: Western Digital
       physical id: 0
       bus info: scsi@0:0.0.0
       logical name: /dev/sda
       version: 14.0
       serial: WD-WMAJA3488275
       size: 37GiB (40GB)
       capabilities: partitioned partitioned:dos
       configuration: ansiversion=5 signature=000b280f
  *-disk:1
       description: ATA Disk
       product: ST340016A
       vendor: Seagate
       physical id: 1
       bus info: scsi@0:0.1.0
       logical name: /dev/sdb
       version: 3.75
       serial: 3HS63J2C
       size: 37GiB (40GB)
       capabilities: partitioned partitioned:dos
       configuration: ansiversion=5 signature=000b280f
  *-cdrom:0
       description: SCSI CD-ROM
       physical id: 2
       bus info: scsi@1:0.0.0
       logical name: /dev/cdrom
       logical name: /dev/scd0
       logical name: /dev/sr0
       capabilities: audio
       configuration: status=nodisc

In my case I have two disks- disk:0 and disk:1. The logical name of disk:0 is /dev/sda and the one for the second disk is /dev/sdb. Make a note of that. In your case that might be different. Identify which drive will be the source and which one the copy. There are 2 things in the above output that will help you do that- the product and the size. You can also use the command sudo fdisk -l. It will show you the hard drives and their partitions.

Prepare the target drive.

Now that you have identified the target drive you need to put an initial partition on it. In the terminal window you have opened execute:

cfdisk -z /dev/sdb

The cfdisk program will start, then type W and then yes to confirm. This is simple enough but you could also use the GParted program that comes with Ubuntu to do the same.

Install the GNU ddrescue program

Before you can install ddrescue you need to enable the Universe Software Repository. Go to System -> Administration -> Software Sources and then check the box next to “Community-maintained Open Source software (universe)“. Close the window. It will ask you to whether you want to refresh the list of software- go ahead and agree to that. After it finishes you can install ddrescue by running this in the terminal window:

sudo apt-get install gddrescue

Clone the disk.

Now you are ready to clone the drive by executing ddrescue. Specify the source disk first and then the target disk. You can use the -v option to be able to see the progress of the operation:

sudo ddrescue -v /dev/sda /dev/sdb

Make sure you get the order of the drives right or you could overlay the old drive with the new drive and loose all the data!

Depending on the size of your source drive this operation could take a couple of hours or even more. Once it finishes the new drive will be an exact copy of the old one. You can run a quick check on the file systems of the new drive:

e2fsck -fp /dev/sdb1

If the new drive is bigger than the old one you need to extend the partition(s) on it or create another one to make use of the rest of the space. The GParted program that comes with Ubuntu is ideal for this.

Once you are done, remove the old drive and boot from the new disk.

Credit: Ubuntu Kung Fu. Published article from the book.
Manage What Applications to Run on Boot in Ubuntu


Update: November 20th, 2009
I am not sure what I was thinking when I wrote this post, but if you want to easily control the programs that run on boot from a graphical interface go to: System -> Administration -> BootUP-Manager. If you do not have BootUP-Manager do “sudo apt-get install bum”.
If you want to know how to do this from command line, read below.


After I installed vmware server 2.0.2 on my Ubuntu 9.10 machine I realized that it would start every time the computer boots up. This makes total sense to be the default behavior, since you would like your guests to be automatically up and running again after a reboot. But in my case I only used a guest OS every once and a while so I do not want to have all the vmware server processes running on the background for no reason. And since vmware uses a browser based management console it also starts apache and java. That is too much stuff running in vain if you are not going to be using vmware.

My first notion was to check System -> Preferences -> Startup Applications but to my surprise it did not contain the vmware server application.

Since I knew that vmware server can be started or stopped with the /etc/init.d/vmware script, I was fairly sure that the installation had put some links in the rc.d directories to that file.

That meant using the update-rc.d command line utility. It manages all the links in the /etc/rc?.d directories where the “?” is the run level. So you can configure any application that has a script in the /etc/init.d directory to start (or not to start) on boot. You can also easily create your own init.d script by just copying and modifying an existent one.

So, first I checked if vmware has set up any links in the rc.d directories:


ls -l /etc/rc?.d/*vmware
lrwxrwxrwx 1 root root 16 2009-11-03 21:44 /etc/rc0.d/K20vmware -> ../init.d/vmware
lrwxrwxrwx 1 root root 16 2009-11-03 21:44 /etc/rc1.d/K20vmware -> ../init.d/vmware
lrwxrwxrwx 1 root root 16 2009-11-03 21:44 /etc/rc2.d/S20vmware -> ../init.d/vmware
lrwxrwxrwx 1 root root 16 2009-11-03 21:44 /etc/rc3.d/S20vmware -> ../init.d/vmware
lrwxrwxrwx 1 root root 16 2009-11-03 21:44 /etc/rc4.d/S20vmware -> ../init.d/vmware
lrwxrwxrwx 1 root root 16 2009-11-03 21:44 /etc/rc5.d/S20vmware -> ../init.d/vmware
lrwxrwxrwx 1 root root 16 2009-11-03 21:44 /etc/rc6.d/K20vmware -> ../init.d/vmware

If you notice some of the link names start with “K” and some with “S”. “K” means “kill” and “S” means “start”.

To prevent vmware from starting at boot run the following command:

sudo update-rc.d -f vmware remove

This will remove all the links to the /etc/init.d/vmware script. The “f” option here is necessary because it forces update-rc.d to remove the links even though the /etc/init.d/vmware still exists. If you do not specify the “f” option you will have to delete this init.d script first.

If you want to restore the vmware application to run at boot again:

sudo update-rc.d vmware defaults

Debuntu.org has a more detailed explanation of update-rc.d.

Madwifi drivers for Ubuntu 9.10 (Karmic Koala) or linux kernels 2.6.29 and above.

After upgrading to the latest Ubuntu version 9.10 I could no longer compile and install the madwifi drivers. Here are the compilation errors I was getting:

In file included from /home/user/madwifi/madwifi-hal-0.10.5.6/ath/../net80211/ieee80211_monitor.h:34,
from /home/user/madwifi/madwifi-hal-0.10.5.6/ath/if_ath.c:75:
/home/user/madwifi/madwifi-hal-0.10.5.6/ath/../ath/if_athvar.h:107: error: conflicting types for 'irqreturn_t'
include/linux/irqreturn.h:16: note: previous declaration of 'irqreturn_t' was here
/home/user/madwifi/madwifi-hal-0.10.5.6/ath/if_ath.c: In function 'ath_attach':
/home/user/madwifi/madwifi-hal-0.10.5.6/ath/if_ath.c:478: error: 'struct net_device' has no member named 'priv'
/home/user/madwifi/madwifi-hal-0.10.5.6/ath/if_ath.c:819: error: 'struct net_device' has no member named 'open'
/home/user/madwifi/madwifi-hal-0.10.5.6/ath/if_ath.c:820: error: 'struct net_device' has no member named 'stop'
/home/user/madwifi/madwifi-hal-0.10.5.6/ath/if_ath.c:821: error: 'struct net_device' has no member named 'hard_start_xmit'
/home/user/madwifi/madwifi-hal-0.10.5.6/ath/if_ath.c:822: error: 'struct net_device' has no member named 'tx_timeout'
.....
.....
.....
make[3]: *** [/home/user/madwifi/madwifi-hal-0.10.5.6/ath/if_ath.o] Error 1
make[2]: *** [/home/user/madwifi/madwifi-hal-0.10.5.6/ath] Error 2
make[1]: *** [_module_/home/user/madwifi/madwifi-hal-0.10.5.6] Error 2
make[1]: Leaving directory `/usr/src/linux-headers-2.6.31-14-generic'
make: *** [modules] Error 2

This is due to the fact that there was a change in the kernel headers. The new kernels replaced the old net_device structure with a new one called net_device_ops. It looks like this change exists since kernel 2.6.29 and up.

There currently is no stable release of the madwifi drivers for the new kernerls. But the madwifi project's latest trunk compiles and works fine (at least for me) and I have not noticed any issues yet. This should work with any Linux distribution with a kernel of 2.6.29 and above. To find out your kernel version run:

uname -r

Here is how to get and install it:

1. You can either get the latest trunk from the madwifi website at http://snapshots.madwifi-project.org/madwifi-trunk-current.tar.gz or use the one that worked for me: madwifi-trunk-r4099-20090929.tar.gz

2. Download and uncompress the files:

Provided you downloaded the madwifi-trunk-r4099-20090929.tar.gz file, cd to the directory containing the file. Then gunzip and untar the files:

tar -xvzf madwifi-trunk-r4099-20090929.tar.gz

Cd into the newly created directory:

cd madwifi-trunk-r4099-20090929

3. Install the drivers:

First make sure you have the kernel headers:

sudo apt-get install build-essential

Now compile and install:

sudo make
sudo make install

4. Add the ath_pci module to the kernel:

You need to add a line to the end of the /etc/modules file. The line should read: ath_pci. You can do this with vi of course, but if you don't know the vi editor then it would be much easier to use gedit. So, do:

sudo gedit /etc/modules

Add ath_pci to the end of the file. Here is how my file looks:

# /etc/modules: kernel modules to load at boot time.
#
# This file contains the names of kernel modules that should be loaded
# at boot time, one per line. Lines beginning with "#" are ignored.

lp
sbp2
ath_pci

At this point you can reboot and you should have wireless. You could save yourself a reboot by modprobing the kernel with the ath_pci module like this:

sudo modprobe ath_pci

You should be good to go.

Ubuntu – Choose what volume to control with your keyboard sound controls

Like any other laptop my Acer has a designated keyboard sound control. I can turn the volume up, down or mute it all together. This was working fine until one day I decided to mess with a couple of microphones (the built in and an external one). All of a sudden I noticed that my volume knob no longer controlled the speaker volume but the microphone (input) sound instead.

I automatically decided that I had somehow messed up the kernel keycodes or the GNOME key mapping. After spending sometime looking into this I found out that the issue was much simpler than this.

I must have looked at least a half dozen times at the sound dialog (Preferences->Sound) but on the n-th time I realized what the issue was.

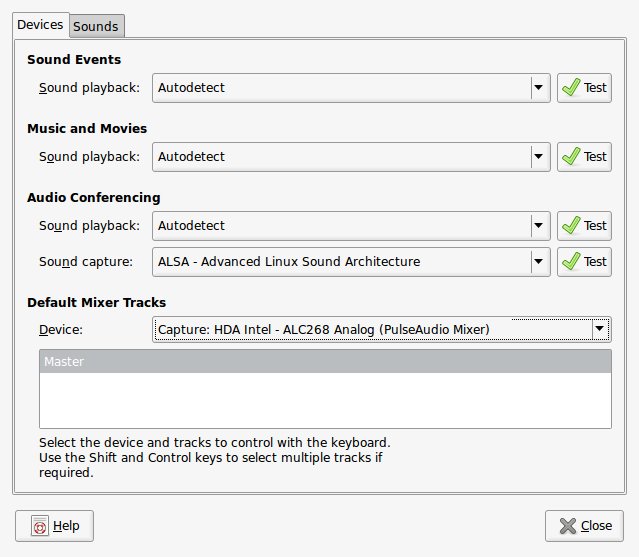
If you look at the bottom of it you will see a section called “Default Mixer Tracks”, then there is a drop down to choose the device and a text box with a bunch of different options:

Sound Preferences
Sound Preferences

Notice the quick explanation at the very bottom: “Select the device and tracks to control with the keyboard…”. They have to put this in red font for ignorant people like me! I only noticed it after I had found out the problem.

I had changed the device in this section to “Capture: HDA Intel” when I was playing with the microphones. All I had to do is put it back to “HDA Intel (Alsa mixer)” and then picked the master track. Then I was back in business…

It is good to know that I can easily change what volume my keyboard controls are in charge of without having to mess with the GNOME key tables.

If you have a problem where the computer does not even respond to a keyboard event, look at this entry in the Ubuntu wiki. It has a good explanation of how to diagnose and fix the issue.

Find out who links to your website

You can use the power of the search engines to find out who has links pointing to your site or to any domain for that matter.

In Google the syntax is allinanchor:domain.name. For example you would put this in the search box:

allinanchor:dimitar.me

to find out all the external links to this site.

In Yahoo and Altavista the syntax is linkdomain:domain.name. For example:

linkdomain:dimitar.me

Besides being useful to find out the popularity of your site, this technique could also be used to find out more information about anyone or anything.

It will allow you to find out who has links to the person in question on their blogs and social networking sites… Also it will show you things like the profiles they had created in different forums for instance (if they had put a link to their site in the profile description of course). There are a lot of possibilities here… Give it a try for yourselves.

Depeche Mode Live in Tampa

I finally materialized a teenage dream and went to see Depeche Mode live last Friday. It was everything I expected even more. They sounded incredible and Dave Gahan’s voice was as good as ever. It could have been the acoustics at the amphitheater but the live performance of the songs was better than the studio versions. Martin Gore also sang 2-3 of his songs and did a great job of it.

Depeche Mode -Ford Amphitheater in Tampa, September 4th 2009

At the concert I felt like I had to go see them again the next day in Fort Lauderdale. May be I should have…

I took a few videos. The quality is not that bad considering I took them with my iPhone.

Their “Tour of the Universe” continues to Mexico and then back in Europe. This could be the last chance to go see them live.

Create Flash video from DVD (DVD to FLV) with Ubuntu

All the steps below are valid for any Linux, not just Debian and Ubuntu. Simply use your distro’s package manager (YaST, Yum, Rpm, etc.) to install the necessary packages. Creating a flash video from a DVD will allow you to post it on Youtube or on your website.

1. Make sure that you have mencoder installed. Mencoder is Mplayer’s movie encoder and it can convert multiple video and audio formats.

If you have not yet installed it, do it now:

sudo apt-get install mencoder

This will install 4 packages: libfaac0 libmp3lame0 libx264-65 libxvidcore4 mencoder.

2. Run the command to convert the DVD file to FLV. This is a sample command, you will have to change the paths to the input and output files if necessary. In this case the input file is: /media/cdrom0/VIDEO_TS/VTS_01_1.VOB and the output file is video.flv, which is specified after the “-o” option:


mencoder /media/cdrom0/VIDEO_TS/VTS_01_1.VOB -o video.flv -of lavf -ovc lavc -oac mp3lame -lavcopts vcodec=flv:vbitrate=500:autoaspect:mbd=2:mv0:trell:v4mv:cbp:last_pred=3:predia=2:dia=2:precmp=2:cmp=2:subcmp=2:preme=2:turbo:acodec=mp3:abitrate=56 -vf scale=320:240 -srate 22050 -af lavcresample=22050

As you can see, mencoder has a lot of options and you can control just about everything. Check out the man pages for mencoder for more information.