Configure pfSense for Chromecast Across Subnets/VLANs

Chromecast devices are discoverable on the network via the mDNS protocol and that works well when all devices are on the same network. Things start to break down though if the Chromecast devices and the clients that would like to cast to them (phones, PCs, etc.) are on different subnets. In that case the clients cannot “see” the Chromecast devices to cast to.

The issue is that mDNS is a broadcast protocol and the mDNS packets have a TTL of 1, which means that they are not routable and they do not get propagated anywhere outside of the local subnet.

In order to fix this issue, we need to find a way to re-broadcast the mDNS packets from one subnet to the next. In pfSense we can do this with the Avahi package:

  1. Install Avahi

    In pfSense, go to System -> Package Manager -> Available Packages, search for “Avahi” and then hit the “Install” button next to it.
  1. Configure Avahi

    Go to Services -> Avahi

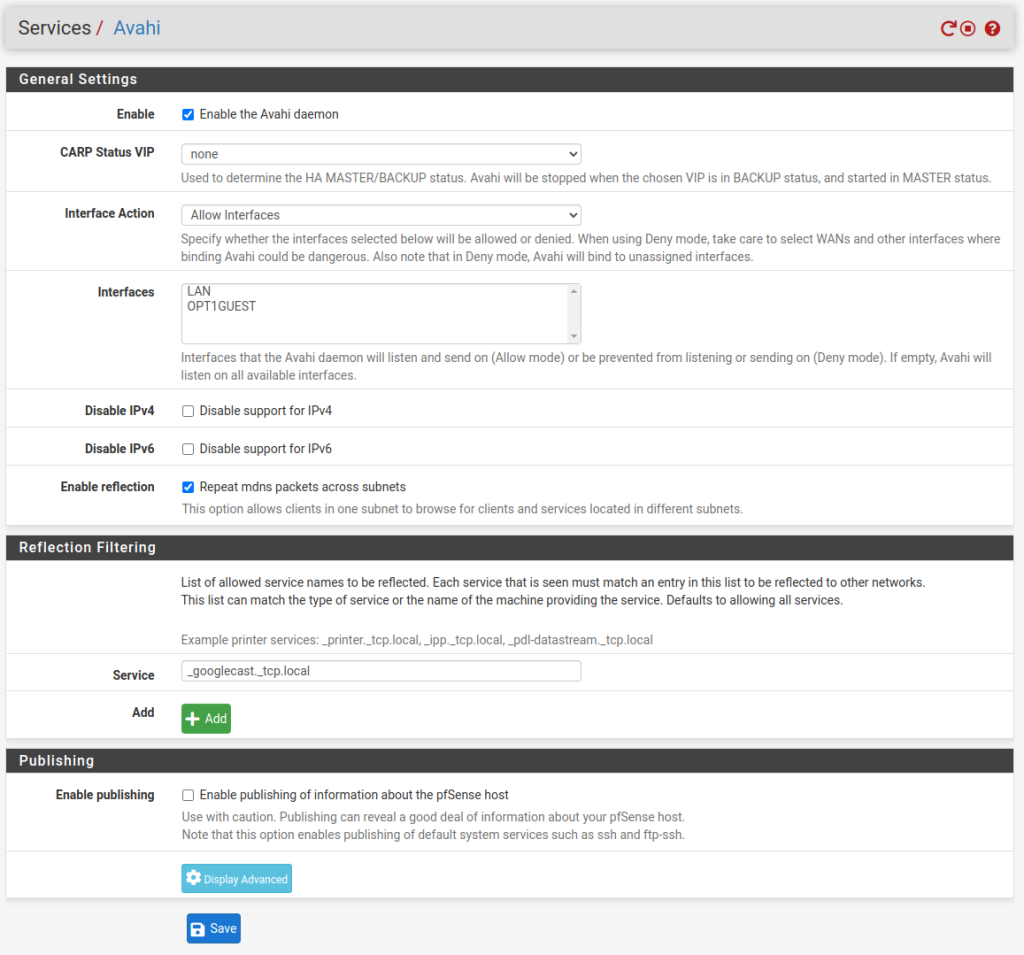
    Enable the Avahi deamon, the action should be “Allow Interfaces” and make sure that all the desired interfaces and VLANs are listed in the “Interfaces” input box. Then enable the “Repeat mdns packets across subnets” option. That should open another block titled “Reflection Filtering”. In that box we need to put in the mDNS service names to be allowed to be replicated. Google Chrome devices use the _googlecast._tcp.local service name, so enter “_googlecast._tcp.local” in the “Service” box. If you have other services that you would like to allow advertising/discoverablility for (e.g. printers), hit the “Add” button and enter the desired service name in the next “Service” input box. Here is how this looks in my case:
Setup Avahi service on pfSense to handle mDNS for Chromecast devices.

Once done, hit “Save” and then restart the service by clicking the restart red arrow button at the top right.

Now the Chromacast devices should be discoverable by the clients on your other networks. You should be able to cast different application content, like YouTube, Pocket Cast etc.

If you want to be able to video stream to the Chromecast devices from the other networks as well, for example casting devices screens or browser tabs, then the Chromecast devices need to be able to reach the source devices over TCP/5556 and TCP/5558.

To do that you need to add a rule to your interface where the Chromecast devices are on to allow them to reach the other network(s) over TCP on these two destination ports.

But first, it is better to create an alias with the two ports that later will be used by the new firewall rule. That is not mandatory and not the only way to do this, but in my opinion is a cleaner and more future proof option than the alternatives. It just makes things so much easier to read and maintain.

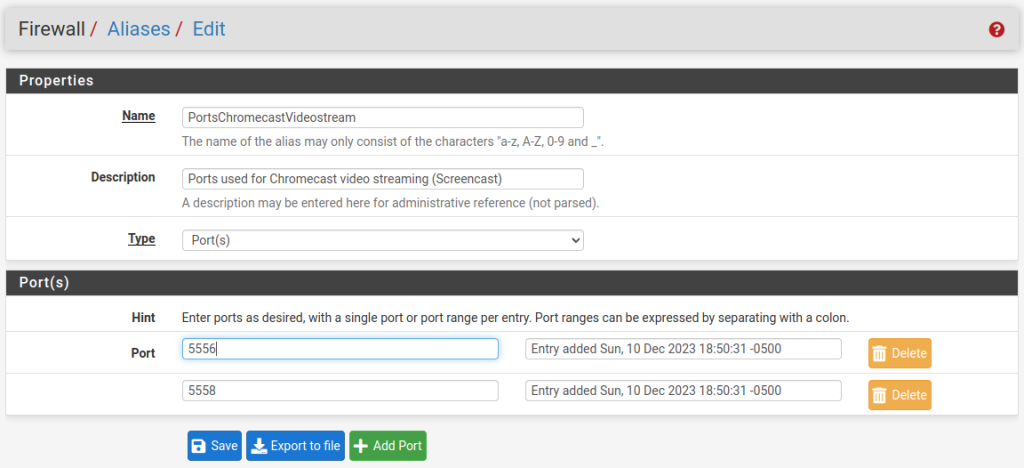
Go to Firewall -> Aliases -> Ports and the “Add” button. Give the alias a name and description and pick “ports” from the Type drop down, then enter the two ports and hit “Save”:

Add an alias entry in pfSense for the two Chromecast video streaming ports.

Now we are ready to add a firewall rule that will use this alias.

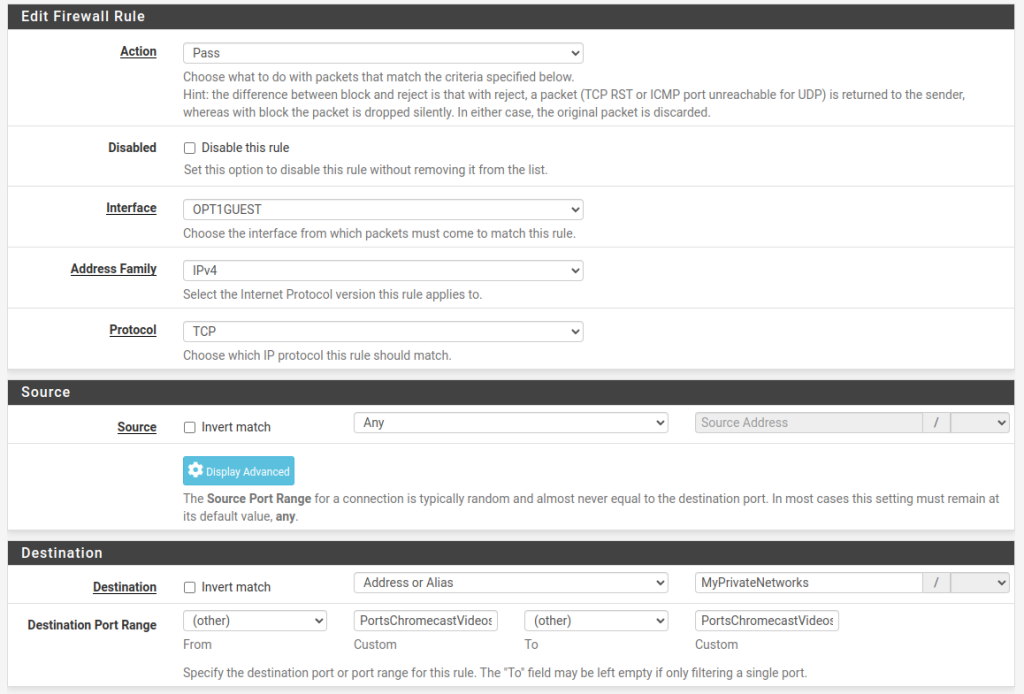
Go to Firewall -> Rules and pick the interface for the network/VLAN where your Chromecast devices reside and hit the “Add” button with the arrow pointing up in order to add a new rule at the top. In most cases there will be block rules following this rule, so we need to ensure that this rule will be reachable. In this new rule we could be very restrictive and specify the IPs of each individual Chromecast device in the source of this rule as well as specify individual IPs on the other networks that will be steaming the videos, but I think this is an overkill unless there is a specific concern or need. Having any source to any destination over these two ports will probably be all that is needed.

In my case, the interface for the Chromecast devices and other IoT devices is named “OPT1GUEST”. I have allowed any source on that network to reach all my private networks over TCP on these two ports:

Add a firewall rule in pfSense to allow TCP traffic on the two Chromecast video streaming ports.

The “MyPrivateNetworks” above is an alias that contains the network ranges of all my private networks (you can pick “any” here in most cases) and the “PortsChromecastVideosPorts” is the alias we created above with the two ports defined.

Additional resources: Configuration document from Cisco on setting up mDNS service for Chromecast devices

Replace tabs with spaces in vi

Collaborating with other developers often means that not everyone is on the same side of the “tabs vs spaces” debate. I will spear everyone a rant on that subject. Let’s just say that I often find myself in a situation where I have to replace the leading tab characters of each line with spaces. That of course fixes the indentation issues with the code. The below vi command will substitute any number of leading tabs on each line with four spaces for each tab:

:%s/^\t\+/    /g

Ubuntu / Debian – Remove all unused Linux kernels

Since release 18.04, Ubuntu only keeps the last three kernels in /boot and deletes the older kernels at each kernel upgrade. It keeps the latest kernel and the two previous versions that were installed and removes all the rest. To do that manually on any Ubuntu version you can run:

sudo apt --purge autoremove

If you are on a newer Ubuntu version, the above command will most likely not remove any additional kernels, since by default Ubuntu has already removed the older ones and left the latest three kernels. It can remove other packages that are left on the system and are unused, but that will not help much in the cases where you don’t have enough space in /boot.

So, if you do not have enough space in /boot, read on.

If you had installed Ubuntu a while back the /boot partition might be a bit too small. For example one of my old laptops only has a 200MB boot partition. That means that every time I have a kernel upgrade, it fails due to insufficient space. In order to be able to install the new kernel, I need to purge all previous kernels and only leave the one that it is currently booted into. Here is a one line command to delete all unused Linux kernels:

echo $(dpkg -l | grep linux-image | awk '{ print $2 }' | sort -V | sed -n '/'`uname -r`'/q;p') $(dpkg -l | grep linux-headers | awk '{ print $2 }' | sort -V | sed -n '/'"$(uname -r | sed "s/\([0-9.-]*\)-\([^0-9]\+\)/\1/")"'/q;p') | xargs sudo apt-get -y purge

Note: A special caution is due here- run this at your own risk.

The above command lists all installed Linux kernels and Linux kernel headers, then it excludes the version that is currently running on the system and then pipes that into the purge command, which goes though all the packages in that list and removes them.

If you are not absolutely sure how that works, I recommend doing a “dry run” first. To do that, run this command to find out your currently running Linux kernel:

uname -r

This will give you the version of the currently running kernel. Make a note of it.

Next, run this command, which will list all the kernels and kernel headers that will be removed:

echo $(dpkg -l | grep linux-image | awk '{ print $2 }' | sort -V | sed -n '/'`uname -r`'/q;p') $(dpkg -l | grep linux-headers | awk '{ print $2 }' | sort -V | sed -n '/'"$(uname -r | sed "s/\([0-9.-]*\)-\([^0-9]\+\)/\1/")"'/q;p')

Now go through that list and make sure that the version that you are currently running (the one from the output of “uname -r”) is not in that list.

If you want to be extra, extra careful, you can omit the “-y” flag from the apt-get command, which will ask you to confirm the removal of each an every kernel before deleting it:

echo $(dpkg -l | grep linux-image | awk '{ print $2 }' | sort -V | sed -n '/'`uname -r`'/q;p') $(dpkg -l | grep linux-headers | awk '{ print $2 }' | sort -V | sed -n '/'"$(uname -r | sed "s/\([0-9.-]*\)-\([^0-9]\+\)/\1/")"'/q;p') | xargs sudo apt-get purge

Now you should have enough space freed up in /boot to upgrade the kernel.

How to fix VMware unable to install all modules vmmon vmnet

VMware needs to recompile the kernel modules after each kernel upgrade. We are all pretty familiar with this, since VMware requests module recompilation when launched after a kernel upgrade.

In the vast majority of the cases that will go smoothly without any hick-ups, but in rare occasions this might fail, especially after a major kernel upgrade.

The fix for this is to download the latest kernel modules for our VMware version and install them:

  1. Check the version of your installed VMware Player.

    vmplayer --version

  2. Get the version of your currently running kernel, in case there are multiple modules compiled for different kernel versions

    uname -r

  3. Download the appropriate vmmon and vmnet modules.

    Visit: https://github.com/mkubecek/vmware-host-modules/tags

    Download the appropriate module file depending on your Vmware Player version (and optionally kernel version). In this case I am running VMware Player ver. 16.2.4 and a kernel ver. of 5.19, so I would download the p16.2.4-k5.19 file. Here “p” stands for player (if you have the VMware Workstation instead, then you would download the one starting with a “w”):
Download VMware (Player and Workstation) host modules
  1. Extract the tarball file, create the tar module files and copy them over to the vmware’s source modules directory

    tar -xvf vmware-host-modules-w16.2.4-k5.19.tar.gz
    cd vmware-host-modules-w16.2.4-k5.19
    tar -cf vmmon.tar vmmon-only
    tar -cf vmnet.tar vmnet-only

    sudo cp -v vmmon.tar vmnet.tar /usr/lib/vmware/modules/source/

  2. Install the modules

    sudo vmware-modconfig --console --install-all

You should be able to launch VMware normally now.

Default java commands for manually installed JDK on Debian based distros

The update-alternatives is used to handle situations where multiple applications that accomplish the same task are installed on the system, but we would like to set a default on which one to be used…..

I moved the JDK from another system into /usr/lib/jvm/java-8-oracle

If I just try to compile with javac or run java or javaws on the command, I will get “command not found” as the java binaries in /usr/lib/jvm/java-8-oracle/bin are not in my exported PATH.

I could add to my PATH in .bashrc the path to /usr/lib/jvm/java-8-oracle/bin. That would solve the problem of running these commands from any directory on the command line but it would not work for another user on the system.

So, add the java, javac and javaws or any other commands as defaults.

Add a new alternative for “java”, “javac” and “javaws”.

sudo update-alternatives --install /usr/bin/java java /usr/lib/jvm/java-8-oracle/bin/java 1
sudo update-alternatives --install /usr/bin/javac javac /usr/lib/jvm/java-8-oracle/bin/javac 1
sudo update-alternatives --install /usr/bin/javaws javaws /usr/lib/jvm/java-8-oracle/bin/javaws 1

You can now list all alternatives for the “java” name for example and set which one will be the default by using the –config option:

sudo update-alternatives --config java

Configure phpMyAdmin with a remote database

We have the following scenario: Server A runs a web server with phpMyaAmin, which connects to Server B. In this case we are using Debian packages, so Server A is assumed to be running Debian, Ubuntu, Mint or another Debian derivative.

Server B is the MySQL server with all databases including the database for phpMyAdmin.

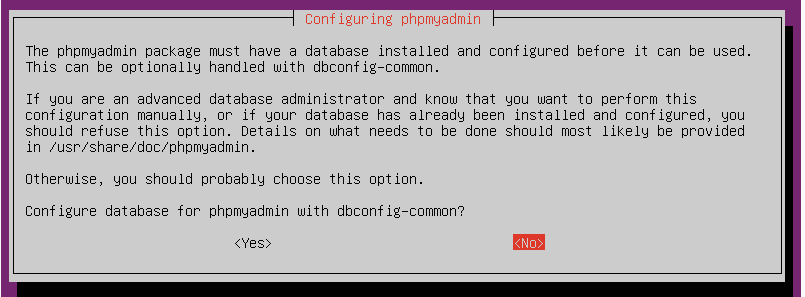
If you are installing phpMyAdmin for the first time on Server A, select “No” when asked “Configure database for phpmyadmin with dbconfig-common?“:

Configure database for phpmyadmin with dbconfig-common?

The above assumes that the phpMyAdmin database is on the localhost. We will run the dbconfig-common package manually to reconfigure that.

Regardless if you just installed phpMyAdmin and selected “No” on the above question, or you have a prior installation of phpMyAdmin that you would like now to connect to a remote server, run the dbconfig-common package:

sudo dpkg-reconfigure dbconfig-common
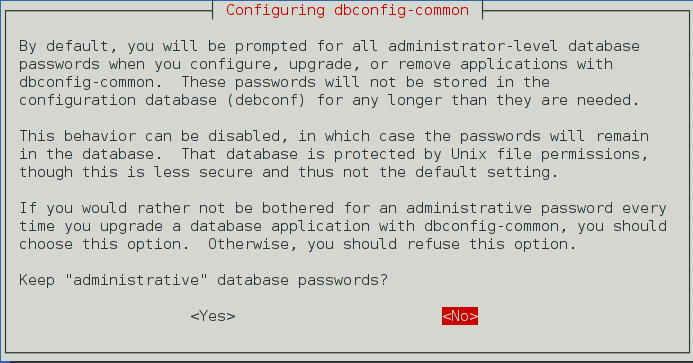
Keep “administrative” database passwords?
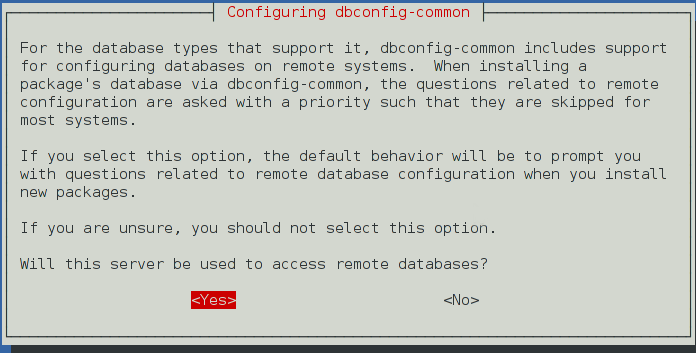
Will this server be used to access remote databases?

Now we can reconfigure phpMyAdmin and specify the remote server name among other things. A couple of things to consider before starting:

  1. The remote database server should be reachable from Server A, that includes MySQL server, which should be accessible from this host. By default MySQL only listens to localhost, so make sure it is configured correctly.
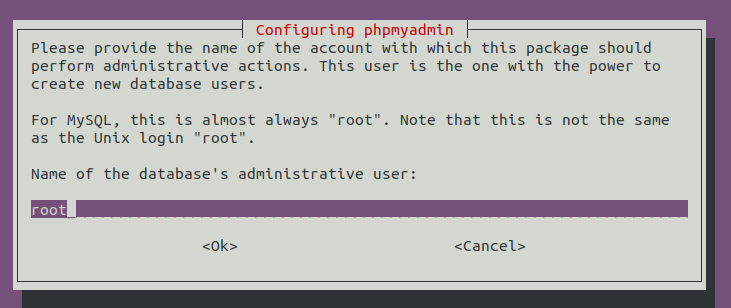
  2. We will need a user on the remote MySQL server with full rights. This user will be used to drop an existent phpmyamdmin database, create a new one as well create an owner user of the new phpmyamdmin db. Very often the root user is used, but it could be any other user with full rights. This user must be able to login from this remote server (ServerA).
  3. We will be asked about what user will be the phpmyadmin owner. That user will only have rights to the phpmyadmin db and only be used by this phpmyadmin installation, so no need to bother ourselves with setting a password to remember. We can just leave the password blank and the package will create one randomly. That password will be saved in /etc/dbconfig-common/phpmyadmin.conf if you ever need to(highly unlikely) reference it.
sudo dpkg-reconfigure phpmyadmin
Reinstall database for phpmyadmin?
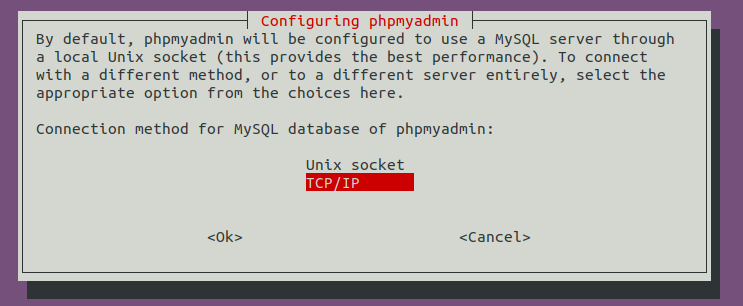
“TCP/IP” connection method is used for connecting to a remote host
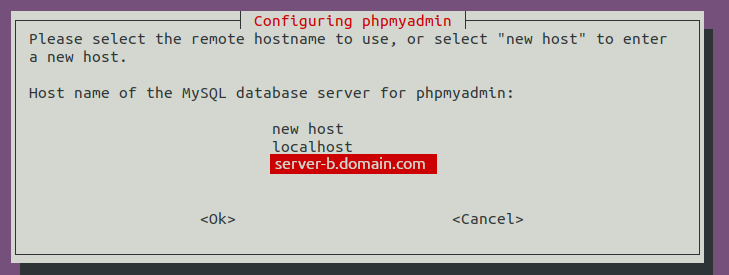
Specify the remote server running MySQL
Specify the port that MySQL is listening to on the remote server
If this database exists, it will be dropped and re-created
Enter the database user that will be created and used as the owner of the phpmyadmin database
You can specify a password or leave blank
Enter the admin user with full rights to the MySQL database then enter the password on the next screen
Make sure to hit the Space bar, in order to select (place a star) next to the desired web server!

Restart apache:

sudo systemctl restart apache2

You can now browse to the phpMyAdmin site and login.

All the above configuration is written in the /etc/dbconfig-common/phpmyadmin.conf and /etc/phpmyadmin/config-db.php config files. The config-db.php should not be edited manually, as it gets overwritten. If you change the phpmyadmin.conf file, you need to run “dpkg-reconfigure phpmyadmin” again.

Add additional remote MySQL servers for phpMyAdmin to connect to

The file /etc/phpmyadmin/config-db.php, we created above, holds the configuration of the default MySQL db server we are connecting to. But we can add more servers to connect to, which will give us a drop down in the phpMyAdmin login screen, where we can pick what server to connect to.

If you look at the end of the /etc/phpmyadmin/config.inc.php and you will find the following code:

/* Support additional configurations */
foreach (glob('/etc/phpmyadmin/conf.d/*.php') as $filename)
{
    include($filename);
}

That means that if we add another file in /etc/phpmyadmin/conf.d directory and we name it ending with .php, that file will be read as well.

So, we can add a file called server-c.inc.php in that above directory with the following content. Make sure to increment the “i” variable at the end of the file, so this configuration does not get overwritten if we add another config file in this directory in the future.

$cfg['Servers'][$i]['verbose'] = 'Remote Server C';
$cfg['Servers'][$i]['auth_type'] = 'cookie';
$cfg['Servers'][$i]['host'] = 'server-c.domain.com';
$cfg['Servers'][$i]['port'] = '3306';
$cfg['Servers'][$i]['connect_type'] = 'tcp';
$cfg['Servers'][$i]['extension'] = 'mysqli';
$cfg['Servers'][$i]['AllowNoPassword'] = false;
$cfg['Servers'][$i]['controluser'] = phpmyadmin_dbuser;
$cfg['Servers'][$i]['controlpass'] = phpmyadmin_dbuser_pass;
$i++;

You can add other advanced settings in this file. See reference for more options: https://docs.phpmyadmin.net/en/latest/config.html#server-connection-settings

Remove Windows carriage return characters with vi

This is pretty standard search an replace command in vi, but I always forget how to specify the carriage return character (‘^M‘): Ctrl+V for the ‘^‘ and Ctrl+M for the ‘M

The command is:

:%s/^M//g

For those new to vi:

While you have the file opened in vi, hit Escape to make sure you are in command mode. Then type “:” to go to the command line and then type the string shown above. The ^M portion of this command requires typing Ctrl+V to get the ^ and then Ctrl+M to insert the M. The %s is a substitute operation, the slashes again separate the characters we want to remove and the text (nothing) we want to replace it with. The “g” (global) means to do this on every line in the file.

MySQL replication without the downtime

This is just a copy from the origin article https://plusbryan.com/mysql-replication-without-downtime

The original site has been taken down. Since this is very useful, I am posting the original content here for future reference.

Setting up MySQL replication without the downtime

I clearly don’t need to expound on the benefits of master-slave replication for your MySQL database. It’s simply a good idea; one nicety I looked forward to was the ability to run backups from the slave without impacting the performance of our production database. But the benefits abound.

Most tutorials on master-slave replication use a read lock to accomplish a consistent copy during initial setup. Barbaric! With our users sending thousands of cards and gifts at all hours of the night, I wanted to find a way to accomplish the migration without any downtime.

@pQd via ServerFault suggests enabling bin-logging and taking a non-locking dump with the binlog position included. In effect, you’re creating a copy of the db marked with a timestamp, which allows the slave to catch up once you’ve migrated the data over. This seems like the best way to set up a MySQL slave with no downtime, so I figured I’d document the step-by-step here, in case it proves helpful for others.

First, you’ll need to configure the master’s /etc/mysql/my.cnf by adding these lines in the [mysqld] section:

server-id=1
binlog-format = mixed
log-bin=mysql-bin
datadir=/var/lib/mysql
innodb_flush_log_at_trx_commit=1
sync_binlog=1

Restart the master mysql server and create a replication user that your slave server will use to connect to the master:

CREATE USER replicant@;
GRANT REPLICATION SLAVE ON . TO replicant@ IDENTIFIED BY '';

Note: Mysql allows for passwords up to 32 characters for replication users.

Next, create the backup file with the binlog position. It will affect the performance of your database server, but won’t lock your tables:

mysqldump --skip-lock-tables --single-transaction --flush-logs --hex-blob --master-data=2 -A > ~/dump.sql

Now, examine the head of the file and jot down the values for MASTER_LOG_FILE and MASTER_LOG_POS. You will need them later:

head dump.sql -n80 | grep "MASTER_LOG_POS"

Because this file for me was huge, I gzip’ed it before transferring it to the slave, but that’s optional:

gzip ~/dump.sql

Now we need to transfer the dump file to our slave server (if you didn’t gzip first, remove the .gz bit):

scp ~/dump.sql.gz mysql-user@<>:~/

While that’s running, you should log into your slave server, and edit your /etc/mysql/my.cnf file to add the following lines:

server-id = 101
binlog-format = mixed
log_bin = mysql-bin
relay-log = mysql-relay-bin
log-slave-updates = 1
read-only = 1

Restart the mysql slave, and then import your dump file:

gunzip ~/dump.sql.gz
mysql -u root -p < ~/dump.sql

Log into your mysql console on your slave server and run the following commands to set up and start replication:

CHANGE MASTER TO MASTER_HOST='<>',MASTER_USER='replicant',MASTER_PASSWORD='<>', MASTER_LOG_FILE='<>', MASTER_LOG_POS=<>;
START SLAVE;

To check the progress of your slave:

SHOW SLAVE STATUS \G

If all is well, Last_Error will be blank, and Slave_IO_State will report “Waiting for master to send event”. Look for Seconds_Behind_Master which indicates how far behind it is. It took me a few hours to accomplish all of the above, but the slave caught up in a matter of minutes. YMMV.

And now you have a newly minted mysql slave server without experiencing any downtime!

A parting tip: Sometimes errors occur in replication. For example, if you accidentally change a row of data on your slave. If this happens, fix the data, then run:

STOP SLAVE;SET GLOBAL SQL_SLAVE_SKIP_COUNTER = 1;START SLAVE;

Update: In following my own post when setting up another slave, I ran into an issue with authentication. The slave status showed an error of 1045 (credential error) even though I was able to directly connect using the replicant credentials. It turns out that MySQL allows passwords up to 32 characters in length for master-slave replication.

Android Studio – Automatically sign the apk in debug mode

Android Studio no longer automatically signs the apk when pressing the “Run” button in debug mode. That makes it challenging to develop and test on a physical devise, especially when the signature of the apk is required for some functions of the app.

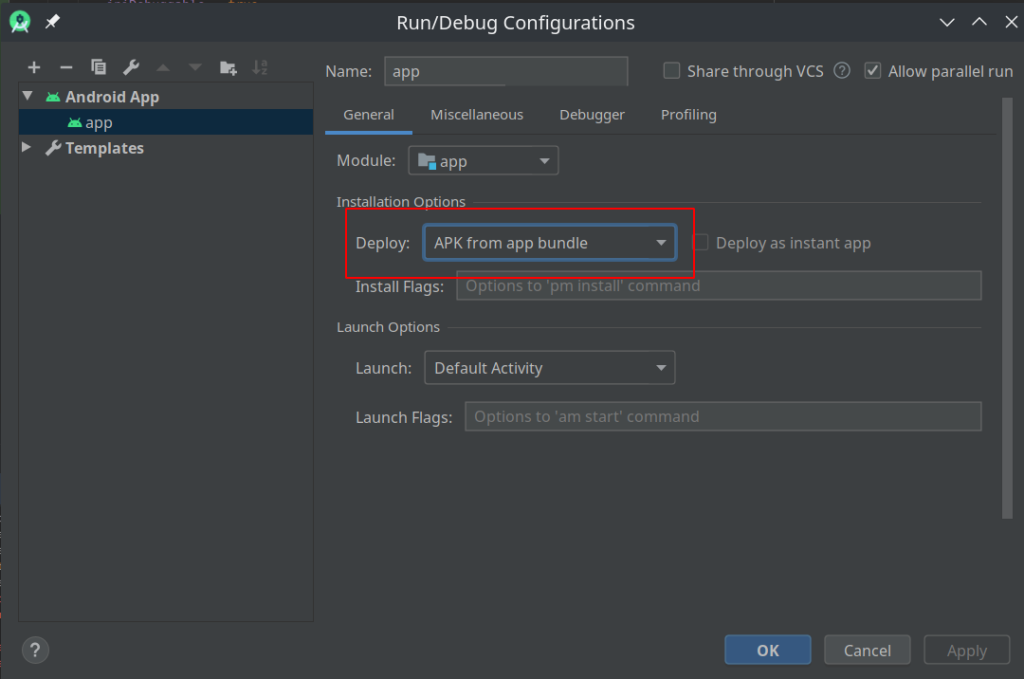
One way to fix this is to add custom tasks to the Gradle build, but the fastest solution is to to just edit the running configuration and select “APK from app bundle” under “Installation options”.

Open Run -> Edit Configurations:

PHP – increase file size and number of uploads limits

A little while ago I had a quick post on how to increase the file size and number of file upload limits by editing the values straight in the php.ini file. This approach works, but we need to understand the down sides it presents as well:

  1. The changes to the php.ini could easily be lost after a php upgrade. Each non minor php version upgrade will come with its own php.ini and our prior settings will be lost.
  2. The php.ini file is global. If we have multiple sites on the server using the same php version, then any settings we make in the php.ini file will affect all sites.
  3. These settings are most likely not included in any source control. Normally we would have our web application code pushed to a git repo for example, but since the php.ini file is not part of the application, but rather a part of the host environment, it normally would not be in the repository. Any subsequent checkouts of that repo will be missing these settings.

A better approach

Instead of making the changes in the base line php.ini file, we can make them in the .htaccess file off the root of each website we are interested of having those changes apply to. We do that by adding php_value in front of each php directive:

php_value upload_max_filesize 20M
php_value max_file_uploads 30
php_value post_max_size 608M
php_value memory_limit 616M
php_value max_execution_time 60
php_value max_input_time 120

Once we save that in the .htaccess file, the changes are instantaneous for that site. No need to restart Apache.

If we now display the phpinfo for that site, we will see that the local values of the above settings (local to the site) have changed as set above, while the master values have remained unchanged.