KARMA is an application that transforms the right wireless NIC into the ultimate Access Point. Unlike a regular AP, which advertises its SSID to whoever wants to connect to it, the KARMA enabled AP passively listens to any client wireless requests and then responds to it with the SSID that it probed for and thus impersonating virtually any Access Point. In short, it presents itself to each client as whatever the client wants it to be and allows it to establish a connection. So it can be “Linksys” to one computer, “MyHome” to another and completely different to someone else.
In order to run KARMA, you need a wireless card with the appropriate chipset, which supports the MadWifi drivers. As a general rule the Atheros based chipset are compatible with MadWifi, but you can check the complete list with the supported hardware just in case before you buy anything.
MadWifi drivers and KARMA are included in the BT3 Linux distribution and that makes it real easy to turn your laptop into the perfect Access Point. Just boot into BT3 from a CD or a USB thumb drive.
KARMA also simulates different services like FTP and DNS so that you can temporarily trick the wireless clients that they are getting somewhere, just like a “honey pot”. Although this is a lot of fun, a lot more exciting is when you reroute them out to the internet so that they can browse just like they expected and at the same time you can examine their network traffic without them even suspecting anything.
In this case it is best to install KARMA on a router. Just make sure it has the right wireless chipset, then blow out the firmware it came with and install DD-WRT, OpenWRT, Tomato or any of the sort, then put KARMA on it and you are good to go. There is a very neat project started by Darren Kitchen and the folks at HAK5, called Jasager. They installed KARMA on a fon router and created a quick web front end to it. In HAK5’s episode # 412 Darren demonstrates network sniffing and session hijacking of the wireless clients connected to Jasager from Windows.
The fon router is relatively quite small and very appropriate for this purpose. So I bought a fonera router myself, put OpenWRT and KARMA on it and continued from there. Check out Darren Kitchen’s step by step process of how to accomplish this.
Lets look at how the network set up will theoretically work. We need to reroute the network traffic from the fon router to the internet and have a packet sniffer like Wireshark in the middle. For this I need to set up a simple gateway on my Ubuntu laptop that will be between the fon router and the Internet. I also have to set up a DHCP server to assign IP addresses to all the wireless clients as they connect to my AP. In this case I will connect the fon router to my Ethernet jack and I will use my wireless NIC on my laptop to connect it to my home router, which gives me the Internet access. Here is a simple diagram of how this will look:
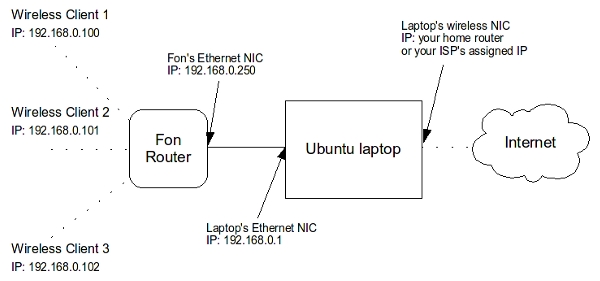
Step 1. Install the DHCP server and the front end to it for easy configuration:
sudo apt-get install dhcp3-server
sudo apt-get install gadmin-dhcpd
The first command above will install the dhcp server and after it finishes it will try to start it and will give you a message that it failed to do so. This is normal, since you have not configured it yet, so just ignore it for now and execute the second command. We will configure it in Step 3.
Step 2. Install a front end graphics tool to set up the gateway:
sudo apt-get install firestarter
Step 3. Configure the DHCP server.
We need to keep the 2 NICs on different networks. In my case the Ethernet card that will be connected to the fon router will be on the 192.168.0.0 network and the wireles NIC that is connected to my home router and then to the Internet is on the 192.168.1.0 network.
Start the GADMIN-DHCPD: System Tools -> GADMIN-DHCPD.
Under “Scope settings” put in the network interface name (in my case it is eth0). You can find out all the interfaces on your computer by running the ifconfig command. Then put in 192.168.0.0 for a “Network address” and finally 255.255.255.0 for the “Subnet mask”. Now click the “Apply” button. You also need to specify the range of IP addresses that the dhcp server can use. So under “Shared IP-addresses ranges” put- “Range from: 192.168.0.10 to: 192.168.0.110”. Then click the “Add” button:
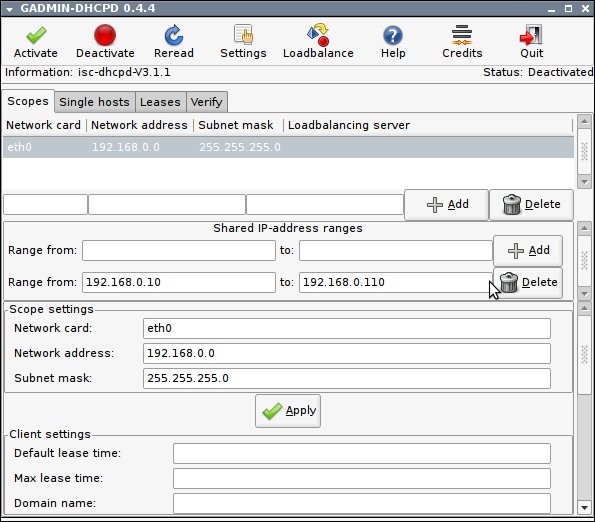
Step 4. Before we can configure our wired interface, we need to give the fon router a static IP address and DHCP server IP. Connect your fon router to your Ethernet port and power it on. Now open your browser and connect to the webif interface of the router. In my case it is http://192.168.1.1/webif.html (Refer to Daren Kitchen’s tutorial if needed). Go to the “Network” tab and change the connection type to DHCP, leave the “Type” to “Bridged” and put in the IP address of 192.168.0.250 and the Subnet mask of 255.255.255.0. Click “Save Changes” and then “Apply Changes” in the bottom right corner of the page. And finally, in the “Connection Type” drop-down go back to Static IP and make sure that the new settings are retained:
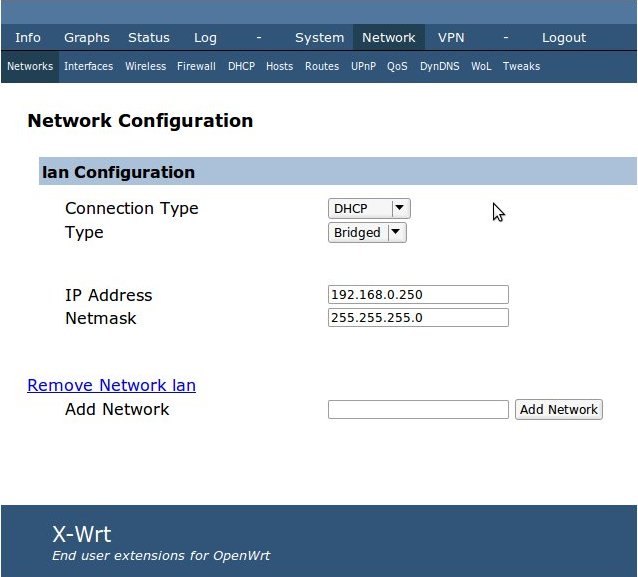
At this point you can power off the fon router for now. The next step is to give static IP settings to the wired NIC in order to put it on the same network as the fon router. The 192.168.0.0 network in this case.
Step 5. Configure the Ethernet NIC that the fon router is connected to:
Go to System -> Preferences -> Network Configuration or you can right-click on the networks incon on your menu bar and select Edit Connections:
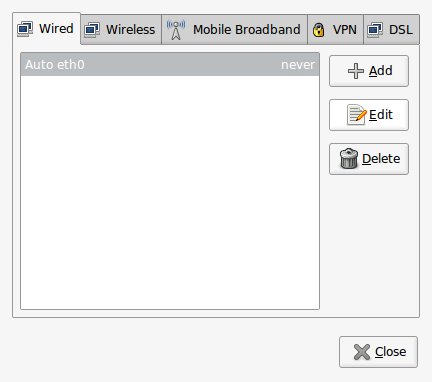
Then under the “Wired” tab select your interface and hit “Edit”. Then hit the IPv4 tab, select “Manual” from the “Method” dropdown. Hit the “Add” button and put 192.168.0.1 for the IP address, 255.255.255.0 for the Netmask and leave the Gateway blank. You need to also specify a DNS server. There are a hundred different ways you can find your DNS server but the easiest in Linux would be to look at the /etc/resolv.conf file. So, execute the command more /etc/resolv.conf and use that IP address as your DNS server. In my case, the DNS server for my laptop is my router at IP address 192.168.1.1 (you can also use your ISP’s DNS server). In any case, keep in mind that if you take your laptop somewhere else (for example your local coffee shop) the DNS server will change. After you are done, hit “OK”:
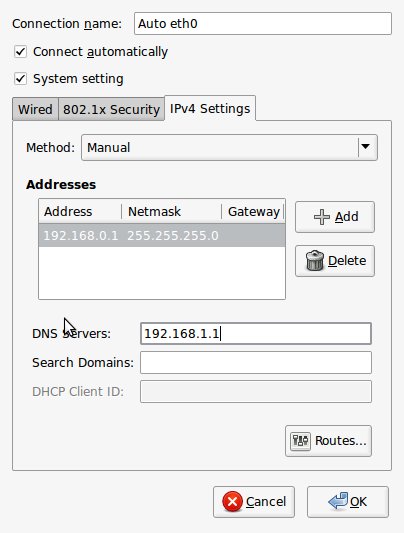
Now the wired interface is configured to the 192.168.0.0 network, the DHCPD settings have the same network and interface, and the fon router is also configured on the same network.
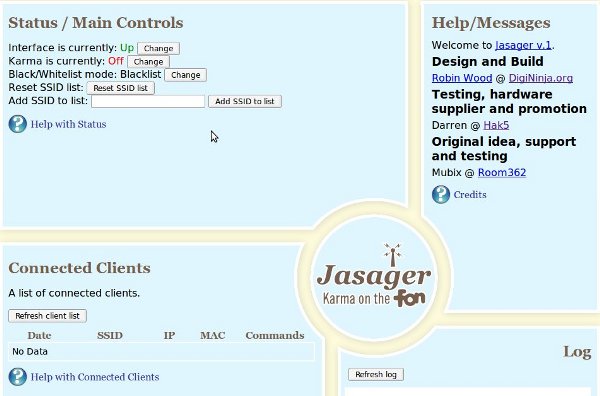
Step 6. Power up the fon router. Now you should be able to connect to it on IP address 192.168.0.250. Open up your browser and this time connect to the “Ysager” page. Enter http://192.168.0.250. The Jasager page should come up:
Step 7. Configure the gateway.
The only thing that is left is to configure the gateway so that we can forward the traffic from the wired NIC to the other interface pointing out to the Internet (the wireless NIC in this case, which is connected to the home router and then out to the Internet). Linux has this built into the kernel and we can set all this up using the command line to do the so called “masquerading”, but it is much easier to use a GUI tool that we installed in Step 2.
Fire up the firestarter: Go to Internet -> Firestarter.
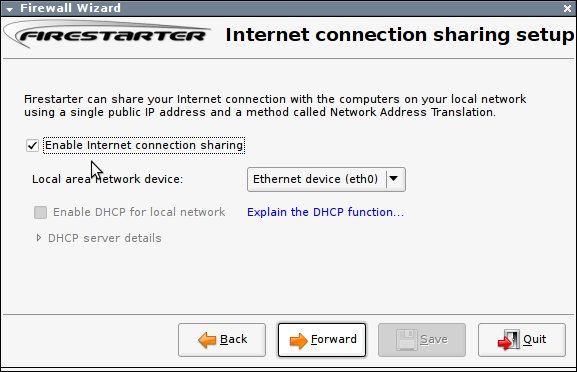
First it will ask you to specify your Internet connected device. In this case it is my laptop’s wireless interface, so I chose “wlan0” from the dropdown. Click “Forward” and in the next screen specify your wired Ethernet interface (in this case eth0), then select the checkbox named “Enable Internet connection sharing”:
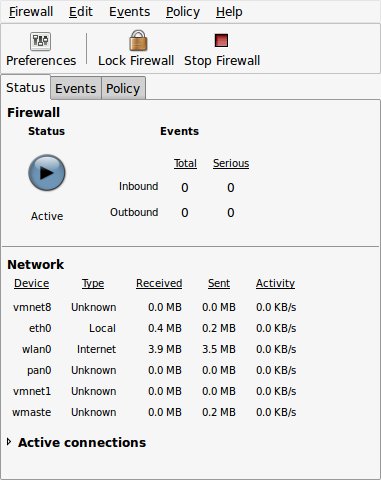
Next click “Forward” again, and finally click “Save”. This will start the gateway. You should see something like this (only without the vmnet interfaces, those are there because I have VMWare server installed on this machine):
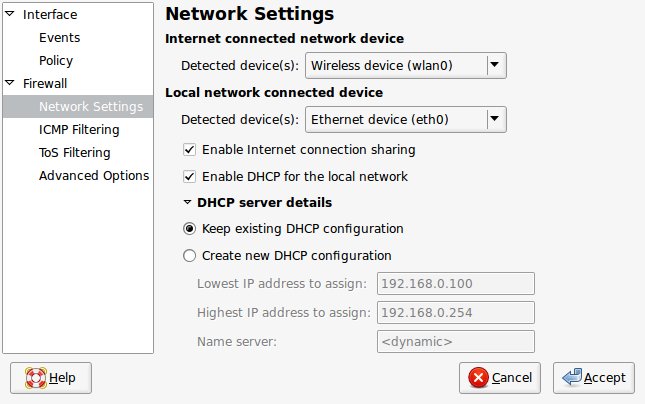
Now enable the DHCP. Click on the “Preferences” button in the above screen. Go to “Network Settings” and select the checkbox “Enable DHCP for the local network” and hit “Accept”:
At this point you can test if your router can find its way to the Internet through your gateway. Just start a terminal session. Type ssh root@192.168.0.250 and enter your password when prompted. After you log in, just ping any Internet site like- ping yahoo.com, you should be getting responses back:
$ ssh root@192.168.0.250root@192.168.0.250’s password:BusyBox v1.4.2 (2007-09-29 07:21:40 CEST) Built-in shell (ash)
Enter ‘help’ for a list of built-in commands.
_______ ________ __
| |.—–.—–.—–.| | | |.—-.| |_
| – || _ | -__| || | | || _|| _|
|_______|| __|_____|__|__||________||__| |____|
|__| W I R E L E S S F R E E D O M
KAMIKAZE (7.09) ———————————–
* 10 oz Vodka Shake well with ice and strain
* 10 oz Triple sec mixture into 10 shot glasses.
* 10 oz lime juice Salute!
—————————————————
root@net1:~# ping yahoo.com
PING yahoo.com (68.180.206.184): 56 data bytes
64 bytes from 68.180.206.184: icmp_seq=0 ttl=48 time=85.0 ms
64 bytes from 68.180.206.184: icmp_seq=1 ttl=48 time=84.3 ms
64 bytes from 68.180.206.184: icmp_seq=2 ttl=48 time=86.3 ms— yahoo.com ping statistics —
3 packets transmitted, 3 packets received, 0% packet loss
round-trip min/avg/max = 84.3/85.2/86.3 ms
This means that your network settings are correct.
Step 8. Enable KARMA and start Wireshark.
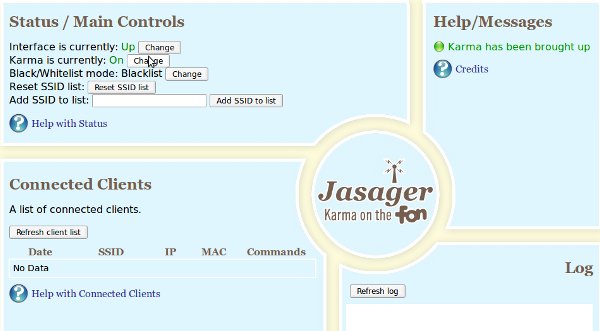
Go back to the Jasager screen you opened in your browser in Step 6 and hit the “Change” button next to “Karma is currently: Off” to start KARMA:
The last thing is to fire up Wireshark and start the capture on the eth0 interface. Now you will be able to see all the traffic of anyone connected to your fon router.
Thanks Man, found this through the hak5 forums.
I do all my wlan stuff from my Ibex box,
was starting this next week b/c I asked for one of these for Christmas and Santa came through for me!
Thanks for the great write up!
firemann816
I like Santa !!! 🙂
If you run into anything… let me know.
After i sent my router to 192.168.0.250, it will not let me access the router. even if i give my pc a static or auto ip address. On auto it gives me 192.168.3.12 but no gateway. reseting it doesn’t help either. If you know how i can fix it please let me know.
As soon as you give your router the IP address of 192.168.0.250 you will no longer be able to access it until you reconfigure your interface that is connected to it.
The reason for that is because now your router is on the 192.168.0.0 network and your interface is on the 192.168.1.0 network. What you need to do is give your wired interface a static IP address that is in the 192.168.0.* range. You can use any IP between 192.168.0.1 and 192.168.0.254 excluding the 192.168.0.250 (this is the IP address of the router). Follow step 5 above. Make sure that you are configuring the right interface.
If you still cannot access it, you can connect to your router through your wireless interface (like a regular access point) and make sure the settings are right.
Is it possible to use the bult in DHCP server in OpenWrt and let it handle the whole jasager-subnetwork or does it interfere with Karma?
I am not sure what do you mean by
If you are trying to reroute the network traffic through your computer so you can sniff it, then you need to make it (the computer) the DHCP server. The Jasager (OpenWRT) will query your computer’s DHCP server for an IP address to be issued to any wireless client that connects to it.
If you don’t want to channel the traffic through an external gateway, then the built in DHCP server will do. But then you will not be able to sniff the traffic.
If this did not answer your question, please clarify.
..gadmin-dhcpd and firestarter i had never heard of them until reading this. Will be installing them on ubuntu 9.10 and backtrack 4 (8.10)..
great tutorial..
thanks..
(sod route and iptables, masquerading etc..)
There is a script in back|track 4 called mitmap.sh which requires dhcp.conf to be specified. It can be used to create fake ap’s..
Not much on google about it..It uses digininja madwifi patches..
Will definately be using firestarter and gadmin-dhcp3..
thanks..
DO NOT TURN OFF FON IF IT IS TAKING TO LONG TO CHANGE SETTINGS..
I did and now it’s broken…
This guide was by far (and that says a lot) the best one I’ve seen on setting up the Jasager for action.
I’m totally new at this, and it was a great learning experience. For those who are troubleshooting (like I was), here’s a few tips that helped me:
1. If you can’t access the Fon from the static IP in step 4, you’re not SOL. Just unplug it, add a host in GADMIN-DHCPD with the MAC address of the Fon and 192.168.0.250 and you’re good to go.
2. If you don’t have the web interface, you don’t need it. Just ssh into the Fon, and type “uci show” to see all the settings and “uci set =” to set them. If you really want the web interface, use Darren’s Tutorial (link at the top of this page) and use the opkg tool instead of ipkg to install it.
3. I couldn’t get the ICS working in Firestarter. I found an easy way around it by adding “routers: 192.168.0.1, domain-name servers: 192.168.1.1, and broadcast address: 192.168.0.255” to GADMIN-DHCPD in the “Client Settings” section.
I hope those help you if you’re stuck and if not, make sure you did all the above steps in the guide correctly and check out the Hak5 forums. There’s a whole forum dedicated to the Jasager. Thanks again for this great guide!
I just got the Upside-Down-Ternet hack (http://www.ex-parrot.com/pete/upside-down-ternet.html) working on Jasager with my laptop. It was a pain to set up because I didn’t know what I was doing with IPTables but I finally figured it out a few minutes ago.
If you’re interested in doing that, follow this tutorial (https://help.ubuntu.com/community/Upside-Down-TernetHowTo) except for the networking setup.
For that, kill firestarter because we’re using iptables straight up. Just save the following code as “iptables.conf”, use iptables-restore < /wherever/you/saved/iptables.conf to set up your firewall and you should be good to go.
*nat
-A POSTROUTING -j MASQUERADE
-A PREROUTING -i eth0 -p tcp -m tcp –dport 80 -j REDIRECT –to-ports 3128
-A PREROUTING -p all -d 192.168.0.1 -j DNAT –to-destination 192.168.1.1
COMMIT
*filter
:OUTBOUND – [0:0]
-A INPUT -i lo -j ACCEPT
-A INPUT -m state –state ESTABLISHED -j ACCEPT
-A INPUT -p all -s 127.0.0.1 -d 127.0.0.1 -j ACCEPT
COMMIT
“I also have to set up a DHCP server to assign IP addresses to all the wireless clients as they connect to my AP”
could you please clearefy for me where do you run the dhcp server?
Is in on the FON or on the UBUNTU PC.
I cant get it from the contex.
I asume it does not matter where you run it as long as the gateway the clients get is my laptop connection to the internet( correct me if I am wrong here)
@gerard,
That sentence refers to Step 3 in the tutorial.
The DHCP server runs on the Ubuntu PC. Then in Step 4 you configure the Fon router to get IP addresses from the DHCP server on your Ubuntu PC.
Ok, iv been at this for a few hours now and im not the one to ask questions because google always has the answer.Anyways my issue is this:
So i change the ip settings on the Fon to use the 0 network, then i click “apply changes on the router”, i let it sit for half an hour and still nothing happens, i unplug it (some ppl say that breaks it but im not so sure). i plug it back in, and it appears to be working (lights are blinking normally etc). I plug the eth from the fon to my computer, then i change the eth0 int to use the 0 network. I then type 192.168.0.250 in a browser (what the Fon should be)i can connect to it, but i cant get the web interface. this is driving me nuts. maybe something is wrong with my configuration or should i do a hardware reset of the Fon.
nevermind, dumb question i figured it out.
Hi, dimitar.me
Great tutorial, thanks a lot Dimitar. I have one question, in step 4 after I hit save and apply it just sits there and doesn’t move. I unplugged it and plug it back in; well my router went to crap so I re-flash it. Is there any thing i missing or need to do?
Thank You,
Reboot
@ RebootArchive,
This is addressed in my comment above made on February the 12th, 09.
I will add this in the post, so no one else gets stuck on this.
Read several Yasager installation tutorials all of them slightly contradictory of each other. I followed yours word for word, and it worked straight away.
Brilliant, thank you at lot.
Pingback:When Wireless Goes Rogue « Ham Radio Weblog PD0AC