Implementing Android GCM in a different package other than the main application package

There is something you need to be aware of if you are placing your GCM (Google Cloud Messaging, aka push notifications) service (the one extending from GCMBaseIntentService) in a package other than the main application package. The default implementation of the GCMBroadcastReceiver class, whcih is part of the GCM library assumes that your service is going to be in the main application package. If the service is in a different package though, then it will not be able to be started by the broadcast receiver and if you are debugging your app it will look like your app requests a Registration ID from the Google servers, but then everything dies off and you are not getting a response back.

What you need to do in this case is extend the GCMBroadcastReceiver class and override the getGCMIntentServiceClassName method to return the package name of the service and the service class name. So for example, if your service was called GCMIntentService in package com.mycompany.mainpackage.somepackage, you would return: “com.mycompany.mainpackage.somepackage.GCMIntentService”. Here is an example of the extanded GCMBroadcastReceiver class:


public class GCMMyBoadcastReceiver extends GCMBroadcastReceiver {
	protected String getGCMIntentServiceClassName(Context contest) {
		return "com.mycompany.mainpackage.somepackage.GCMIntentService";
	}
}

Also, do not forget to update your manifest file to make sure that the new extended broadcast receiver is used:


<receiver android:name="com.mycompany.mainpackage.somepackage.GCMMyBoadcastReceiver" android:permission="com.google.android.c2dm.permission.SEND">
    <intent-filter>
        <action android:name="com.google.android.c2dm.intent.RECEIVE" />
	<action android:name="com.google.android.c2dm.intent.REGISTRATION" />
        <category android:name="com.mycompany.mainpackage" />
   </intent-filter>
</receiver>

This little detail wasted a coule of hours of my time trying to figure out what I did wrong. Unfortunatly this detial is not well documented (not even mentioned) in their GCM implementation tutorial.

Quick and easy way to remove all single line (//) comments in Eclipse

I had to quickly remove single line comments from an Android project in Eclipse. I could not find any built in feature in Eclipse to do that. So I resorted to a simple regular expression:

(//[^\n]*)

This simple regex selects all the strings that begin with “//” and end with a new line. So all you have to do is use it in the find and replace option for a file or to apply to the whole project or multiple files do Search -> File. Also, make sure to select the “regular expression” check box.

This is something I did very quickly… so be careful since it might pick up some urls as well… like anything after the “//” part in “http://mysite.com/page.php”.

A small bug in the Android In-App Billing demo app causes “Item Not Found”

Important: This is not a bug in the API! It is only a bug in the demo Dungeons application that Google provides.

Several months ago (May, 2012) Google released the new version (v2) of the Android In-App Billing API that supports auto-renewing subscriptions. That was a huge step forward! Thank you Google!
I started implementing this in my apps soon after but then discovered one small annoying bug in their demo application (Dungeons). It causes the the incorrect response of “item not found”.
I published the solution a couple of months ago to stackoverflow and the official android developers forum.

The bug is in the onClick for the Purchase button in the Dungeons class of the sample application.

The supplied method has a bug in the if {} else if {} statement where it causes the mBillingService.requestPurchase to be called twice, when the selected item is not a subscription item (mManagedType != Managed.SUBSCRIPTION). So the same item will be requested twice, once with an item type of “inapp” (which is the valid request) and immediately after that with an item type of “subs” (which is incorrect and it shows “item not found”).

Here is the buggy code:

if (mManagedType != Managed.SUBSCRIPTION &&
                    !mBillingService.requestPurchase(mSku, Consts.ITEM_TYPE_INAPP, mPayloadContents)) {
                showDialog(DIALOG_BILLING_NOT_SUPPORTED_ID);
            } else if (!mBillingService.requestPurchase(mSku, Consts.ITEM_TYPE_SUBSCRIPTION, mPayloadContents)) {
                // Note: mManagedType == Managed.SUBSCRIPTION
                showDialog(DIALOG_SUBSCRIPTIONS_NOT_SUPPORTED_ID);
}

To fix this, add mManagedType == Managed.SUBSCRIPTION to the else if above.

Here is how the function should look:

public void onClick(View v) {
        if (v == mBuyButton) {
            if (Consts.DEBUG) {
                Log.d(TAG, "buying: " + mItemName + " sku: " + mSku);
            }

            if (mManagedType != Managed.SUBSCRIPTION &&
                    !mBillingService.requestPurchase(mSku, Consts.ITEM_TYPE_INAPP, mPayloadContents)) {
                showDialog(DIALOG_BILLING_NOT_SUPPORTED_ID);
            } else if (mManagedType == Managed.SUBSCRIPTION && !mBillingService.requestPurchase(mSku, Consts.ITEM_TYPE_SUBSCRIPTION, mPayloadContents)) {
                // Note: mManagedType == Managed.SUBSCRIPTION
                showDialog(DIALOG_SUBSCRIPTIONS_NOT_SUPPORTED_ID);
            }
        } else if (v == mEditPayloadButton) {
            showPayloadEditDialog();
        } else if (v == mEditSubscriptionsButton) {
            editSubscriptions();
        }
    }

Software Center in Ubuntu 12.04 crashes on startup

Recently the Software Center started crashing on startup. Initially I thought it was due to network issues, but after a further examination it turned out not to be the case.
Running it from the panel will not give you any feedback about why it crashes, so I executed it command line to see what is going on:

/usr/bin/software-center

That produced the following output:

2012-05-23 09:47:04,729 - softwarecenter.ui.gtk3.app - INFO - setting up proxy 'None'
2012-05-23 09:47:04,732 - softwarecenter.db.database - INFO - open() database: path=None use_axi=True use_agent=True
2012-05-23 09:47:04,926 - softwarecenter.backend.reviews - WARNING - Could not get usefulness from server, no username in config file
2012-05-23 09:47:05,129 - softwarecenter.db.pkginfo_impl.aptcache - INFO - aptcache.open()
Traceback (most recent call last):
  File "/usr/share/software-center/softwarecenter/db/pkginfo_impl/aptcache.py", line 243, in open
    self._cache = apt.Cache(GtkMainIterationProgress())
  File "/usr/lib/python2.7/dist-packages/apt/cache.py", line 102, in __init__
    self.open(progress)
  File "/usr/lib/python2.7/dist-packages/apt/cache.py", line 145, in open
    self._cache = apt_pkg.Cache(progress)
SystemError: E:Encountered a section with no Package: header, E:Problem with MergeList /var/lib/apt/lists/us.archive.ubuntu.com_ubuntu_dists_precise_multiverse_binary-amd64_Packages, E:The package lists or status file could not be parsed or opened.
2012-05-23 09:47:06,770 - softwarecenter.db.enquire - ERROR - _get_estimate_nr_apps_and_nr_pkgs failed
Traceback (most recent call last):
  File "/usr/share/software-center/softwarecenter/db/enquire.py", line 115, in _get_estimate_nr_apps_and_nr_pkgs
    tmp_matches = enquire.get_mset(0, len(self.db), None, xfilter)
  File "/usr/share/software-center/softwarecenter/db/appfilter.py", line 89, in __call__
    if (not pkgname in self.cache and
  File "/usr/share/software-center/softwarecenter/db/pkginfo_impl/aptcache.py", line 263, in __contains__
    return self._cache.__contains__(k)
AttributeError: 'NoneType' object has no attribute '__contains__'
Traceback (most recent call last):
  File "./software-center", line 176, in 
    app.run(args)
  File "/usr/share/software-center/softwarecenter/ui/gtk3/app.py", line 1343, in run
    self.show_available_packages(args)
  File "/usr/share/software-center/softwarecenter/ui/gtk3/app.py", line 1273, in show_available_packages
    self.view_manager.set_active_view(ViewPages.AVAILABLE)
  File "/usr/share/software-center/softwarecenter/ui/gtk3/session/viewmanager.py", line 149, in set_active_view
    view_widget.init_view()
  File "/usr/share/software-center/softwarecenter/ui/gtk3/panes/availablepane.py", line 168, in init_view
    self.apps_filter)
  File "/usr/share/software-center/softwarecenter/ui/gtk3/views/catview_gtk.py", line 240, in __init__
    self.build(desktopdir)
  File "/usr/share/software-center/softwarecenter/ui/gtk3/views/catview_gtk.py", line 491, in build
    self._build_homepage_view()
  File "/usr/share/software-center/softwarecenter/ui/gtk3/views/catview_gtk.py", line 266, in _build_homepage_view
    self._append_whats_new()
  File "/usr/share/software-center/softwarecenter/ui/gtk3/views/catview_gtk.py", line 430, in _append_whats_new
    whats_new_cat = self._update_whats_new_content()
  File "/usr/share/software-center/softwarecenter/ui/gtk3/views/catview_gtk.py", line 419, in _update_whats_new_content
    docs = whats_new_cat.get_documents(self.db)
  File "/usr/share/software-center/softwarecenter/db/categories.py", line 124, in get_documents
    nonblocking_load=False)
  File "/usr/share/software-center/softwarecenter/db/enquire.py", line 317, in set_query
    self._blocking_perform_search()
  File "/usr/share/software-center/softwarecenter/db/enquire.py", line 212, in _blocking_perform_search
    matches = enquire.get_mset(0, self.limit, None, xfilter)
  File "/usr/share/software-center/softwarecenter/db/appfilter.py", line 89, in __call__
    if (not pkgname in self.cache and
  File "/usr/share/software-center/softwarecenter/db/pkginfo_impl/aptcache.py", line 263, in __contains__
    return self._cache.__contains__(k)
AttributeError: 'NoneType' object has no attribute '__contains__'

As you can see in the SystemError part, it seems to have an issue with the one of the repository lists in /var/lib/apt/lists/, so the natural solution as this post suggests is to remove the one it is complaing about or better yet, remove all and run apt-get update to create them again:

sudo rm -rf /var/lib/apt/lists/*
sudo apt-get update

You should be good to go…

How to get Picasa images using the Image Picker on Android devices running any OS version

Using the Image Picker to get a local image from the Gallery is pretty easy and trivial task. But things get a lot more interesting if the user has a Picasa account and he/she happens to select an image from one of their Picasa albums. If you do not handle this scenario, your app will crash! And there is no way for you to tell the Image Picker to show just local files. So, you have to handle it, or you will be releasing a buggy application!

Things got even more interesting after the release of Honeycomb! All of a sudden the code that was fetching Picasa images and was working flawlessly started failing on devices running OS 3.0 and up. After some investigation I found the culprit- Google changed the URI returned when the user was selecting a Picasa image. This change was completely undocumented, or at least I could not find any documentation on this! So, on devices running Android OS prior to 3.0 the URI returned was an actual URL and now on devices running OS 3.0 and higher, the URI returned had a different format. For example:

1. https://lh4.googleusercontent.com/… (URI returned on devices running OS prior to 3.0)
2. content://com.google.android.gallery3d (URI returned on devices running OS 3.0 and higher)

I posted a brief solution on the official Android bug report site, but I will expand on it here.

In order to properly handle fetching an image from the Gallery you need to handle three scenarios:

1. The user selected a local image file
2. The user selected a Picasa image and the device is running Android version prior to 3.0
3. The user selected a Picasa image and the device is running Android version 3.0 and higher

Let’s delve straight into the code:

1. Start the Image Picker:


private static final int PICTURE_GALLERY = 1;
Intent photoPickerIntent = new Intent(Intent.ACTION_PICK, android.provider.MediaStore.Images.Media.EXTERNAL_CONTENT_URI);
startActivityForResult(photoPickerIntent, PICTURE_GALLERY);

In the first line above I am passing a URI to the intent because I would like to fetch the full image, not just get a Bitmap with the thumbnail. The Android team did a good job of acknowledging that if you just wanted a thumbnail of the image then you can get back a Bitmap object containing it, since a thumbnail would not be that big in size. But if you wanted the full image, it would be foolish to do the same, since that would take up a big chunk of the heap! So, what you get instead is some data about the image file, among which is the path to it.

2. We need to implement the onActivityResult method that will be called when the user closes (picks the image) the Image Gallery application:


@Override
protected void onActivityResult(int requestCode, int resultCode, Intent intent) {
	super.onActivityResult(requestCode, resultCode, intent);
	switch (requestCode) {
		case PICTURE_GALLERY:
		if (resultCode == RESULT_OK && intent != null) {
			Uri selectedImage = intent.getData();
			final String[] filePathColumn = { MediaColumns.DATA, MediaColumns.DISPLAY_NAME };
			Cursor cursor = getContentResolver().query(selectedImage, filePathColumn, null, null, null);
			// some devices (OS versions return an URI of com.android instead of com.google.android
			if (selectedImage.toString().startsWith("content://com.android.gallery3d.provider"))  {
				// use the com.google provider, not the com.android provider.
				selectedImage = Uri.parse(selectedImage.toString().replace("com.android.gallery3d","com.google.android.gallery3d"));
			}
			if (cursor != null) {
				cursor.moveToFirst();
				int columnIndex = cursor.getColumnIndex(MediaColumns.DATA);
				// if it is a picasa image on newer devices with OS 3.0 and up
				if (selectedImage.toString().startsWith("content://com.google.android.gallery3d")){
					columnIndex = cursor.getColumnIndex(MediaColumns.DISPLAY_NAME);
					if (columnIndex != -1) {
						progress_bar.setVisibility(View.VISIBLE);
						final Uri uriurl = selectedImage;
						// Do this in a background thread, since we are fetching a large image from the web
						new Thread(new Runnable() {
							public void run() {
								Bitmap the_image = getBitmap("image_file_name.jpg", uriurl);
							}
						}).start();
					}
				} else { // it is a regular local image file
					String filePath = cursor.getString(columnIndex);
					cursor.close();
					Bitmap the_image = decodeFile(new File(filePath));
				}
			}
			// If it is a picasa image on devices running OS prior to 3.0
			else if (selectedImage != null && selectedImage.toString().length() > 0) {
				progress_bar.setVisibility(View.VISIBLE);
				final Uri uriurl = selectedImage;
				// Do this in a background thread, since we are fetching a large image from the web
				new Thread(new Runnable() {
					public void run() {
						Bitmap the_image = getBitmap("image_file_name.jpg", uriurl);
					}
				}).start();
			}
		}
		break;
	}
}

3. Implement the getBitmap method, which will download the image from the web if the user selected a Picasa image:


private Bitmap getBitmap(String tag, Uri url) 
{
	File cacheDir;
	// if the device has an SD card
	if (android.os.Environment.getExternalStorageState().equals(android.os.Environment.MEDIA_MOUNTED)) {
		cacheDir=new File(android.os.Environment.getExternalStorageDirectory(),".OCFL311");
	} else {
		// it does not have an SD card
	   	cacheDir=ActivityPicture.this.getCacheDir();
	}
	if(!cacheDir.exists())
	    	cacheDir.mkdirs();

	File f=new File(cacheDir, tag);

	try {
		Bitmap bitmap=null;
		InputStream is = null;
		if (url.toString().startsWith("content://com.google.android.gallery3d")) {
			is=getContentResolver().openInputStream(url);
		} else {
			is=new URL(url.toString()).openStream();
		}
		OutputStream os = new FileOutputStream(f);
		Utils.CopyStream(is, os);
		os.close();
		return decodeFile(f);
	} catch (Exception ex) {
		Log.d(Utils.DEBUG_TAG, "Exception: " + ex.getMessage());
		// something went wrong
		ex.printStackTrace();
		return null;
	}
}

The decodeFile method takes a reference to a file and returns a Bitmap. This is pretty trivial. In my case I also scale down the image as I am reading it from the file, so it does not take much memory.

I think Google has some work to do about all this and if they want to seamlessly integrate Picasa with the Android Gallery application, they should have done a better job with the Image Picker functionality. The developer should not be doing all this heavy lifting and be concerned with where the actual image resides. The returned URI should be exactly the same no matter if the image is local or not. And if it is not local, the Gallery app should be fetching it for us. That way, we will have a consistent and predictable functionality. Right now you will be surprised how many applications out there do not handle Picasa images and crash with an ugly error.

Remove vim color coding in Ubuntu

By default Ubuntu’s vim utility is configured to color code certain keywords, comments, extensions, etc.

I personally do not like this. So I just disable that feature. And while I am at it, I also enable the ruler, which displays the line number and the character position of the cursor.

To do that for all users, edit the /etc/vim/vimrc file add the following lines to it:

syntax off		" Clear any font/color/hilighting
set ruler		" Enable the ruler

If you want to do that just for a particular user, create a .vimrc file in that user’s home directory (if it does not already exist) and add the same lines to it.

How to Switch your Google Checkout Account in the Android Market Application

With Google’s last update of the Market application on the Android devices, it became a lot easier to now switch your Google Checkout account associated with all your application purchases.

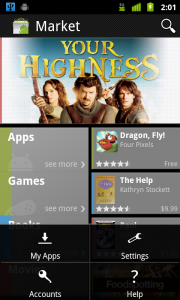
Just fire up the Market application on your device and press the Menu button. That gives you the “Accounts” option, which allows you to switch the Google Checkout account associated with your Market application:

Of course you have to have added your new Google account to the available accounts on the phone before you can do the above switch. To do this, go to:

Menu -> Settings -> Accounts & sync

and add your account (new Gmail email) here. Then you can go to the Market application and switch to this new account.

In the past this used to require a factory reset of the device or a root access.

Although this is a great feature for the consumer, it might also turn out to be an issue in the long run. All downloaded/purchased applications are associated with the Google Checkout account used at the time of acquiring them from the Market. So if you switch your account in the Market application, you will no longer have access to the applications you purchases or downloaded with the previous account. For example, when you go to “My Apps” in the Market application, you will not be able to see the application you downloaded with your old account.

Furthermore (unless Google is doing something new that I am not aware of) all the licensed application you purchased from the Market with the old account will begin to complain that they are not licensed for your new account.

How to sign an unsigned Android package (.apk file)

If you develop with Eclipse, you most likely use the built in Export Wizard to export and sign your Android applications.

There are some cases though, when this method will not do. For example, if you decide to publish your applications on the new Amazon App Store, you will find out that they require you to submit an unsigned apk first. They do some optimizations and DRM (if you chose to use it) processing of it, and then they allow you to download the new package and sign and re-upload the final .apk file.

Amazon provides an option to sign the package for you, but in a lot of cases that will not work. For example, if you use some Google API’s (like Google Maps, etc.) you must sign it yourself! Otherwise the application will not work!

Steps to sign your application:

1. Export the unsigned package:

Right click on the project in Eclipse -> Android Tools -> Export Unsigned Application Package

2. Sign the application using your keystore and the jarsigner tool (comes with the JDK):

Change directory to where your unsigned .apk file is. Then run:

jarsigner -verbose -keystore /path_to_keystore/mykeystore.keystore my_application.apk my_keystore_alias

It will ask you to provide your password:

Enter Passphrase for keystore:

Once you enter the password it will sign your apk. To verify that the signing is successful you can run:

jarsigner -verify my_application.apk

It should come back with:

jar verified.

Just an FYI: The jarsigner tool should be in your /usr/bin directory by default.

Here is a detailed documentation on signing your Android applications: http://developer.android.com/guide/publishing/app-signing.html

3. Do not forget to zipalign the .apk at the very end!

Even though this is not absolutely necessary, it is highly recommended. The zipalign tool optimizes the .apk file and makes it a lot faster to execute.

To zipalign your application:

zipalign -f -v 4 my_application.apk my_zipaligned_application.apk

As you can see, zipalign expects you to provide the input .apk file and specify what you want the output file to be named.

Zipalign tool documentation.

Eclipse Project is Flagged with an “Android Packaging Problem” Error

Sometimes while developing in Eclipse you will notice that the Android Project will be flagged with the red “x” but none of your source files or resources will have errors. If you look in the “Problems” tab you will notice that the project is flagged with an “Android Package Problem” type and the “Location” will be Unknown.

To fix this, just do:

Project->Clean

This will rebuild the project from scratch.

Android Version 2.2.2 Prevents Applications with Copy Protection Turned on from Displaying in the Market

Today I got the Over the Air update of my Nexus One phone to version 2.2.2. To my surprise I could not see some of my applications that were published in the Android Market. Neither could I see a big chunk of the total applications in the Android Market.

After some tests and digging it turned out that applications that have the “Copy Protection” turned on in the “Developer Console” would not be displayed in the Android Market on devices running version 2.2.2.

I have not tested this on devices with ver. 2.3 and 3.0, but I would suspect that the result would be the same.

For a long while the “Copy Protection” feature has been marked as “will be deprecated soon” by Google. No date or any other pointer has been published by Google as to when that will be. I guess we got the answer with this last OS update.

If you want your application to be available to all the devices running the latest OS versions, you will have to turn off the copy protection feature. Of course if your application is paid you would still want to make sure that only people that have purchased it will be able to run it. To do that, just implement the licensing service in your application.